

Few things are as panic-inducing as turning on your computer and being greeted not by your familiar desktop, but by a stark blue screen. 😱
Often, these boot failures point to one specific culprit: a corrupted or missing Boot Configuration Data (BCD) store.
The BCD is essentially a database that tells your computer’s bootloader where Windows is located and how to start it up.
When this file gets damaged—perhaps due to a failed update, disk errors, or malware—your PC is effectively brain-dead upon trying to boot. 🧠
While Windows has automatic repair tools, they notoriously fail to fix complex BCD issues.
This guide will walk you through the advanced, yet entirely manageable, process of manually repairing the Windows Boot Configuration Data (BCD) store using the Command Prompt.
We will bypass the automated fluff and get straight to the raw commands that reconstruct your boot environment from scratch. 🛠️
Prerequisites: The Toolbox You Need
Before digging into the command line, you must have the right tools to access the recovery environment externally.
Since you cannot boot into Windows, you need bootable Windows installation media on a USB drive or DVD. 💿
“Preparation is the key to success. Knowing you have the right tools before you start a complex repair prevents panic halfway through.”
If you do not have one, you need to create it using another working computer.
Microsoft provides the tools to create this media for free.
You can download the official Windows 10 Media Creation Tool directly from their site to create a bootable USB. 💡
Once you have your bootable media ready, insert it into your struggling PC.
You must then configure your BIOS or UEFI settings to boot from that USB drive first.
Video: How to Create Windows 10 Bootable USB Flash Drive
Step 1: Accessing the Command Prompt
Boot your computer using the Windows installation media you just created.
When the initial Windows Setup screen appears, select your language and keyboard preferences, then click “Next”.
On the next screen, look closely at the bottom left corner. 👀
Do not click “Install now”.
Instead, click the link that says “Repair your computer”.
This takes you to the Windows Recovery Environment (WinRE), a blue menu screen with various options.
Navigate through the menu path: Troubleshoot > Advanced options > Command Prompt.
You should now be staring at a black window with a blinking white cursor, usually starting with X:\Sources>. 💻
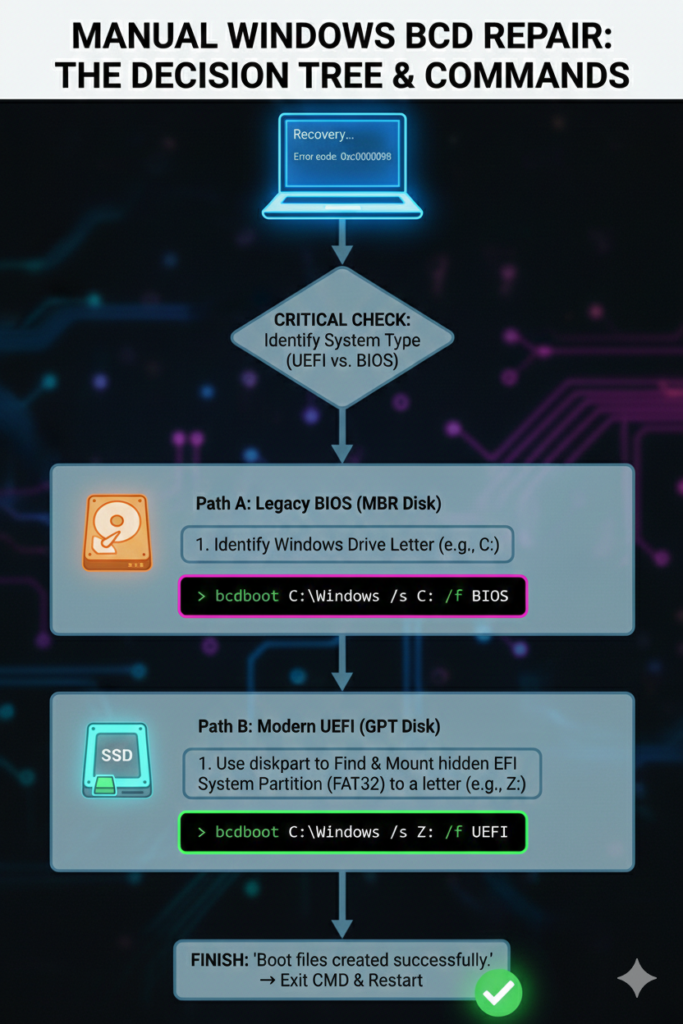
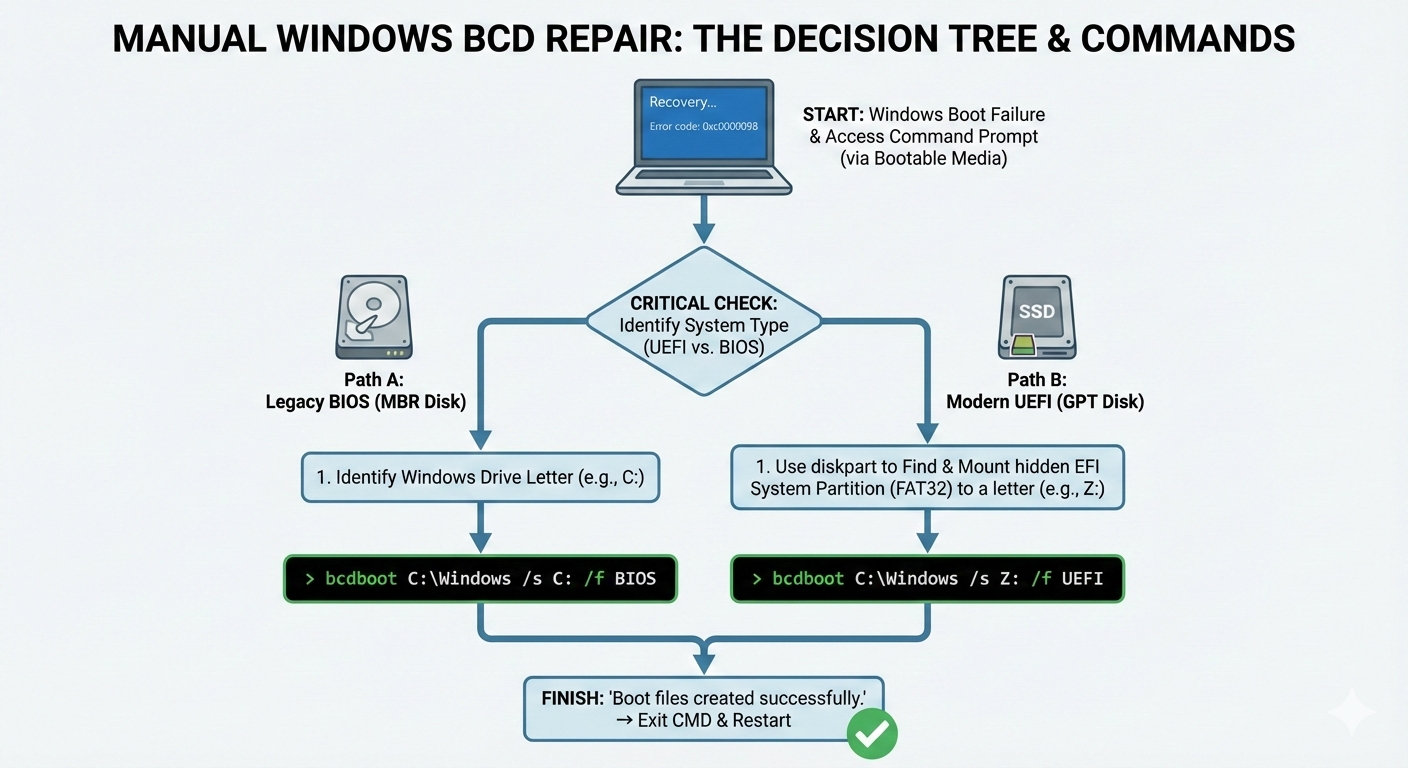
Step 2: Crucial Check – UEFI vs. BIOS
Before we run any BCD commands, we must know how your drive is partitioned.
The repair strategy differs significantly depending on whether your system uses the modern UEFI standard with a GPT disk, or the older BIOS standard with an MBR disk. 🤔
Failing to identify this correctly will cause your repair attempts to fail. 🚫
| Feature | UEFI (Modern) | BIOS (Legacy) |
|---|---|---|
| Disk Partition Style | GPT (GUID Partition Table) | MBR (Master Boot Record) |
| Boot Partition | EFI System Partition (FAT32) | System Reserved (NTFS) |
| Typical Age | Windows 8, 10, 11 PCs | Older Windows 7 PCs |
To find out which you have, we will use the diskpart utility right here in the Command Prompt.
Type diskpart and press Enter.
The prompt will change to DISKPART>. ⌨️
Now, type list disk and press Enter.
Look at the output table, specifically the last column labeled “Gpt”.
If there is an asterisk (*) under the “Gpt” column for your main drive (usually Disk 0), you have a UEFI system.
If the “Gpt” column is blank, you are likely using a legacy BIOS/MBR setup.
Remember this status, as it dictates the next steps.
Type exit to leave Diskpart and return to the standard command prompt.
Step 3: The “Nuclear Option” – Manually Rebuilding the BCD
Many guides will tell you to try commands like bootrec /fixboot or bootrec /rebuildbcd first.
However, if your BCD is truly corrupted, these often return “Access is denied” or fail to find installations. 😓
We are going to skip those and use the more robust bcdboot tool to create a completely fresh BCD store.
“Sometimes it is faster to rebuild a structure from the foundation up than to try and patch the cracks in a crumbling wall.”
Scenario A: The Fix for BIOS/MBR Systems (Legacy)
If you determined in Step 2 that you have an MBR disk (no asterisk under GPT), the process is relatively straightforward.
First, we need to identify the drive letter where Windows is actually installed while in this recovery environment.
It isn’t always C: drive here; sometimes it shifts to D: or E:.
Type dir c: and press enter; if you see “Program Files” and “Windows” folders, C: is correct.
If not, try dir d:, etc., until you find your Windows installation. 🧐
Assuming your Windows is on C:, type the following command and press enter:
bcdboot C:\Windows /s C: /f BIOS
This command tells the tool to take boot files from the Windows folder and create a new BCD store on the C: drive specifically for BIOS systems.
If successful, you will see “Boot files created successfully.” ✅
Scenario B: The Fix for UEFI/GPT Systems (Modern)
This is the most common scenario today, and it is slightly more complex. ⚙️
UEFI systems do not boot directly from the C: drive partition.
UEFI systems boot from a hidden, small partition formatted as FAT32, usually called the EFI System Partition (ESP).
Our goal is to find that hidden partition, give it a drive letter so we can access it, and then copy fresh boot files into it.
We need diskpart again for this.
- Type
diskpartand enter. - Type
list diskand identify your main drive (e.g., Disk 0). - Type
select disk 0(replace 0 with your actual disk number) and enter. - Type
list volumeand press enter.
Now, scrutinize the volume list. 🕵️♀️
You are looking for a small volume (usually around 100MB to 500MB) that is formatted as FAT32. It might be labeled “System” or “ESP”.
Let’s assume this is Volume 2 in your list.
- Type
select volume 2(replace 2 with your actual FAT32 volume number) and enter. - Now we must assign it a letter. Type
assign letter=Zand press enter. (We use Z because it’s unlikely to be taken). - Type
exitto leave Diskpart.
You have now successfully mounted the hidden EFI partition to the letter Z:. 🎉
Just like in the BIOS scenario, ensure you know which letter holds your Windows installation (usually C: or D: in this environment).
Now, execute the final repair command. Assuming Windows is on C: and we mounted the EFI partition to Z:
bcdboot C:\Windows /s Z: /f UEFI
This powerful command copies fresh boot files from the C:\Windows directory onto the Z: partition and configures them specifically for UEFI booting.
You should see the comforting message: “Boot files created successfully.”
If you want to dive deeper into disk management, check out this comprehensive guide to the Diskpart command. 📚
Video: Advanced Manual BCD Repair for UEFI (Visualizing Step 3b)
Step 4: Wrapping Up and Rebooting
Once you have successfully run the bcdboot command for your respective system type, the hard work is done.
Close the Command Prompt window by typing exit or clicking the X in the corner. ✖️
You will be back at the main “Choose an option” blue screen.
Remove your USB installation media from the computer.
Click on “Continue” to exit and boot into Windows 10 or 11.
Fingers crossed, your system should now bypass the previous errors and load the operating system normally. 🤞
Conclusion: Preventative Measures
Manually repairing the Windows Boot Configuration Data (BCD) store is a technical skill, but an incredibly valuable one that saves you from a complete Windows reinstall.
You have successfully navigated the Recovery Environment, identified your partition structure, and used advanced command-line tools to reconstruct the boot sequence. 💪
To avoid this heart-stopping scenario in the future, regular backups are essential.
Consider using full-image backup software, which takes a snapshot of your entire drive, including the boot partitions.
“The only thing better than knowing how to fix a disaster is having a backup that makes the disaster irrelevant.”
PCMag offers excellent reviews on the best backup software currently available.
Furthermore, be cautious when managing disk partitions using third-party tools, as mistakenly modifying the active or EFI partition is a common cause of BCD errors. ⚠️
If you continue to experience boot issues after a successful repair, it may indicate failing hardware, such as your solid-state drive or hard disk.
In such cases, running diagnostic tools or consulting resources like Tom’s Hardware guide on checking SSD health is highly recommended.
Keep your installation media handy, and stay prepared! 🛡️
Video: General Windows 10 Boot Loop Troubleshooting