
Hey everyone!
Have you ever been in the middle of an important task or enjoying your favorite show, and suddenly, a pesky line appears on your laptop screen?
It’s not just an inconvenience; it can be a real headache and a sign that something isn’t quite right with your device.
I’ve been there, and I know how frustrating it can be.
Today, we’re going to dive deep into understanding why these lines appear and, more importantly, how we can fix them.
We’ll explore both the hardware and software culprits behind this common issue. So, let’s get started on restoring your screen’s clarity and functionality!
What Causes Those Annoying Lines?
It turns out, several factors can contribute to lines appearing on your laptop screen.
Sometimes, it’s a simple fix, and other times, it might indicate a more serious problem.
Let’s break down the common causes:
Overheating or Physical Damage: One of the main reasons I’ve seen for screen lines is excessive heat or physical trauma.
Laptops can get pretty hot, especially during heavy use or if they don’t have proper ventilation.
This heat can actually affect the screen, causing those lines to pop up.
And, of course, accidental drops or impacts can directly damage the LCD panel or mess with the connection between the screen and the motherboard.
It’s always a good idea to handle your laptop with care!
Screen Resolution Conflicts: Have you ever noticed how sometimes the display just looks a bit off?
That could be a screen resolution conflict.
This happens when your display settings don’t quite match your monitor’s native resolution.
It might be due to incorrect manual settings or software that changes the resolution without properly syncing with your hardware.

This mismatch can lead to a distorted image, and yes, those annoying lines can appear as your screen tries to render the content.
Refresh Rate Settings: The refresh rate is how many times your screen updates the image per second.
If this setting is too high for your screen’s capabilities, your display might struggle to keep up, resulting in lines.
On the flip side, a refresh rate that’s too low can cause flickering, which can also manifest as lines.
It’s all about finding that sweet spot for your display.
Outdated Device Drivers: Think of drivers as the translators between your operating system and your hardware.
If these drivers are old or corrupted, your screen might not function correctly, leading to lines or other visual glitches.
Keeping your drivers updated is a crucial, yet often overlooked, maintenance step.
Understanding the Different Types of Lines
Not all lines are created equal! Understanding the type of line you’re seeing can give us a clue about the underlying problem.
Let’s look at some common types:
Single Black Line: If you’re seeing just one black line, it often points to a malfunction in a specific row of pixels.
This could be a defect in the screen’s matrix or a problem with an internal connection, like a partially disconnected ribbon cable.
It’s like a single thread coming loose in a fabric.
Multiple Black Lines: When several black lines appear, it usually suggests a more serious issue.
This could indicate widespread damage within the screen’s matrix or a significant malfunction in your graphics system.
This is definitely a sign to pay close attention.
Static Lines: These are lines that stay put, never moving.
They can be a symptom of connection issues between your screen and the graphics card or motherboard.
If you see static lines, it’s a good idea to consider a closer inspection of your internal hardware.
Horizontal or Vertical Lines: These are pretty common and can stem from various factors.
It could be anything from driver conflicts and incorrect resolution settings to physical problems like a damaged display or faulty video cables.
The direction of the line can sometimes give a hint, but the causes often overlap.
Intermittent Lines: These are the trickiest ones! Lines that come and go can be due to loose connections inside your laptop, components overheating, or even intermittent software glitches.
They’re like a flickering light – hard to pinpoint but definitely there.
Flickering Lines: If your lines are flickering, it’s often related to your screen’s refresh rate, incompatible display drivers, or software conflicts that cause instability in how your display renders images.
It’s a sign that your screen is struggling to maintain a stable image.
Ready to Fix It? Here’s How I Approach Troubleshooting!
Alright, now that we understand the ‘why,’ let’s get to the ‘how.’ I always start with the simplest solutions and work my way up. Remember, patience is key when troubleshooting!
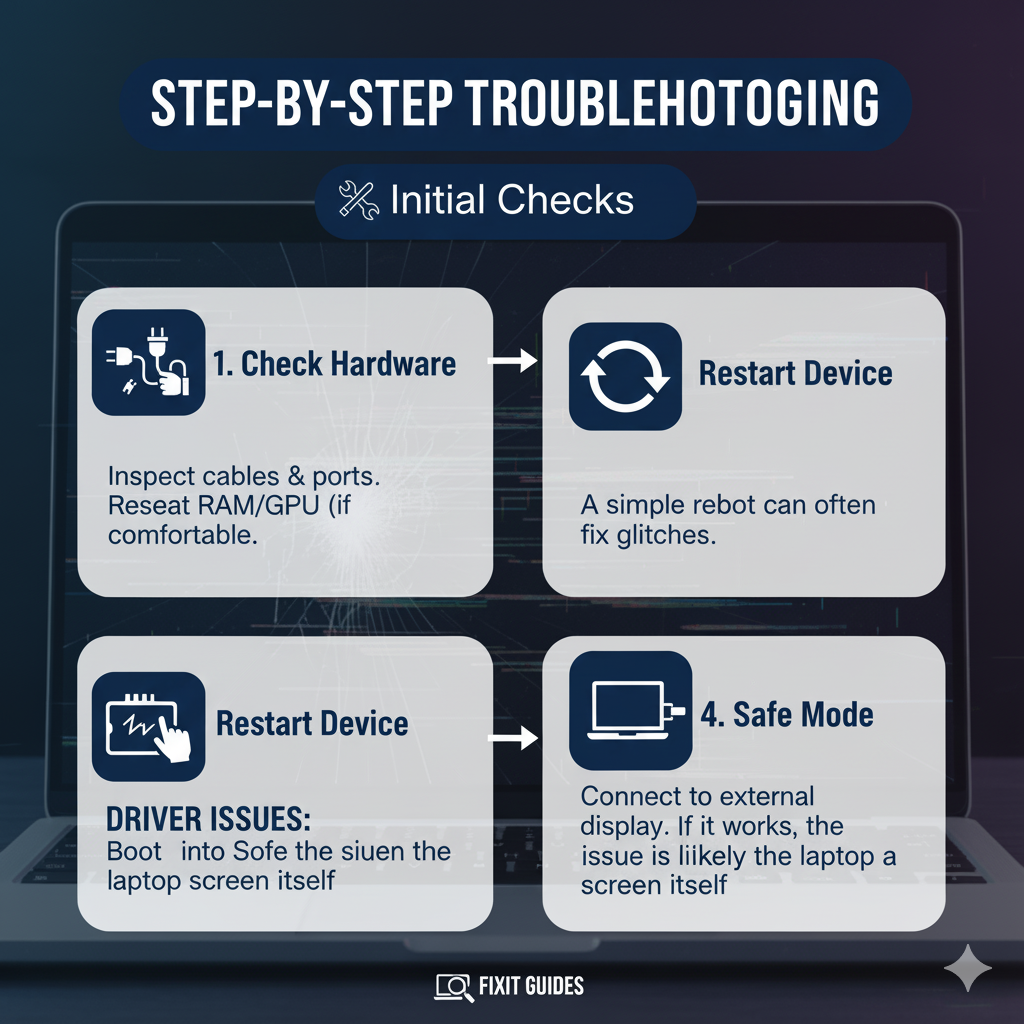
1. Check Your Hardware (The Obvious First Step!):
Before diving into software, let’s give our hardware a quick once-over. Gently clean your screen with a soft, lint-free cloth.
Check for any visible cracks or physical damage.
If you’re comfortable, you might even check if the ribbon cables are securely connected
(though for this, I usually recommend a technician if you’re not experienced).
Also, ensure your monitors and cables are compatible. Sometimes, it’s just a loose connection!

2. Adjust the Screen Resolution (A Quick Software Check):
This is an easy one to try. Right-click on an empty space on your desktop, go to Display Settings, and select the recommended resolution from the dropdown menu.
After that, restart your computer and see if those lines have vanished.
It’s surprising how often this simple step can work wonders!
3. Update Your Graphics Driver (Crucial for Display Health):
This is a big one! Outdated or incompatible graphics drivers are a frequent culprit.
You’ll want to head to your PC’s graphics card manufacturer’s website (think NVIDIA, AMD, Intel) and look for their ‘download’ or ‘support’ section.
Grab the latest driver for your specific model, install it, and then restart your PC. Hopefully, those lines will be a distant memory.
4. Connect to an External Monitor (The Ultimate Diagnostic Test):
This is my go-to test to figure out if the problem is with your laptop’s screen itself or the graphics card.
Connect your laptop to an external monitor.
If the external monitor displays everything perfectly, then you know the issue is with your laptop’s built-in screen.
But if the lines persist on the external monitor, then it’s highly likely your graphics card is the one causing the trouble.
5. Reinstall or Update Windows (When Software Gets Tricky):
Sometimes, the problem isn’t hardware but deep-seated software issues.
Reinstalling or simply updating Windows can often resolve underlying system conflicts or corrupted files that are messing with your display.
It’s a more drastic step, but it can be very effective.
6. Seek Professional Help (When All Else Fails):
Look, we’ve all been there. You’ve tried everything, and those lines just won’t go away.
If none of these solutions work, it’s time to call in the cavalry.
A qualified technician has the tools and expertise to diagnose and fix complex hardware issues, like a damaged LCD panel or a faulty motherboard.
Don’t be afraid to seek professional help; sometimes, it’s the quickest and safest way to get your laptop back in tip-top shape.
My Final Thoughts on Laptop Screen Lines
Dealing with lines on your laptop screen can be annoying, but with a systematic approach, you can often pinpoint and resolve the issue yourself.
Remember to start with the easiest fixes and gradually move to more complex ones.
And always, always back up your data before attempting any major software reinstallations or hardware interventions!
I hope this guide helps you get rid of those unwanted lines and enjoy a clear, crisp display once again.
Happy troubleshooting!