

Ever powered up a new circuit board, only to be met with a disheartening puff of smoke or, worse, nothing at all?
The culprit is often a short circuit, a tiny flaw that can bring even the most meticulously designed electronics to a screeching halt.
It’s a frustrating experience, to say the least, but don’t despair!
Troubleshooting PCB short circuits can feel like detective work, and with the right tools and a bit of creative thinking,
you can pinpoint the problem and bring your beloved electronics back to life.
In this guide, we’ll dive deep into the world of PCB short circuits, exploring their causes, effects, and, most importantly, how to find and fix them.
We’ll go beyond the basics, offering insights and techniques that will empower you to tackle even the most stubborn shorts.
So, grab your multimeter, put on your detective hat, and let’s get started on this exciting journey of electronic resuscitation!
The Sneaky Culprits: Why Do PCBs Short Circuit?
Before we can fix a short, it’s helpful to understand why they happen in the first place.
Think of it like a medical diagnosis – knowing the cause helps with the cure!
PCB short circuits aren’t always obvious, and they can stem from a variety of sources, some more subtle than others.
Videos are added to as random thoughts 💭 💭 💭 🤔
Manufacturing Mishaps: The Unseen Flaws
Sometimes, the problem starts right at the factory.
During the assembly process, tiny errors can creep in.
We’re talking about things like components being slightly misaligned or, more commonly, soldering mistakes.
Imagine a tiny bridge of solder forming where it shouldn’t, connecting two paths that are meant to be separate.
This creates an unintended electrical highway,
and boom –
you’ve got a short. It’s like a rogue detour on your circuit board’s electrical superhighway [1].
Environmental Enemies: Dust, Moisture, and Time
Our electronic friends aren’t immune to the elements.
Over time, exposure to dust, moisture, and other contaminants can wreak havoc.
These seemingly innocent particles can cause corrosion on the circuit board, slowly changing its conductivity.
This can lead to what’s known as an electrochemical short circuit, where ions build up on the board, reducing the lifespan of your electronic components [1].
It’s a slow, silent killer, often going unnoticed until it’s too late.
The Shocking Truth: Electrical Static Discharge (ESD)
Ever felt a static shock when you touch a doorknob?
Imagine that on a microscopic level, but with your delicate PCB components.
Electrical Static Discharge (ESD) can be a real problem, especially for sensitive components like capacitors and integrated circuits (ICs).
A sudden surge of high voltage from static electricity can literally burn out these components, leading to a short.
This is why manufacturers take great care to design PCBs that are resistant to ESD, often incorporating features like high-voltage capacitors and avalanche diodes [1].
Soldering Shenanigans: Too Much or Too Close
This one hits close to home for anyone who’s ever tried their hand at soldering.
Improper soldering is a major cause of short circuits.
It often happens when IC pins are placed too close together, or when there isn’t enough space between components.
If the stencil used for solder paste printing isn’t just right, or the holes are too small,
you can end up with excessive solder that bridges connections.
It’s a messy business, and those tiny bridges are prime suspects for short circuits [1].
The March of Time: Aging and Wear
Nothing lasts forever, and that includes your PCB materials.
Over time, they can degrade, especially when exposed to high temperatures and humidity.
This degradation makes them more susceptible to short circuits.
It’s the natural wear and tear that comes with age, and it’s a reminder that even the most robust electronics have a lifespan [1].
The Ripple Effect: What Happens When a PCB Shorts?
A short circuit isn’t just a minor inconvenience; it can have a cascading effect, leading to a host of problems for your electronic device.
Understanding these consequences highlights the importance of effective troubleshooting and prevention.
Malfunctioning Circuits: The Silent Saboteur
At its core, a short circuit disrupts the normal flow of electricity.
Imagine a carefully planned river system suddenly having a major blockage – the water flow is diverted, and the entire system is affected.
Similarly, a short circuit creates an unintended pathway for current, causing circuits to malfunction or cease working entirely.
Your device might behave erratically, or simply refuse to power on [1].
Component Carnage: The Price of Excess Current
One of the most immediate and damaging effects of a short circuit is the potential for component damage.
When current flows through an unintended, low-resistance path, it can rapidly increase.
This excess current can overwhelm delicate electronic components like
- resistors,
- capacitors,
- and integrated circuits,
leading to their premature failure.
It’s like trying to force too much water through a narrow pipe – something’s bound to burst [1].
Fire Hazard: A Fiery Consequence
Perhaps the most alarming consequence of a short circuit is the risk of fire or electrical hazards.
The increased current flow through a short generates a significant amount of heat.
In extreme cases, this can lead to overheating, melting of components, and even ignition.
This poses a serious safety concern, not just for the device itself, but for its surroundings and users.
It’s a stark reminder that electricity, while incredibly useful, demands respect and proper handling [1].
System Failure: The Domino Effect
In complex electronic systems, a single PCB short circuit can trigger a complete system failure.
This can result in costly downtime, loss of valuable data, and the need for expensive repairs or replacements.
Think of a critical component in a larger machine failing – the entire operation grinds to a halt.
The interconnected nature of PCBs means that a problem in one area can quickly propagate throughout the entire system [1].
Unpredictable Behavior: The Ghost in the Machine
Beyond outright failure, short circuits can also lead to unpredictable behavior in electronic devices.
Your device might experience unexpected shutdowns, intermittent functionality,
or even damage to other connected components.
It’s like a mischievous ghost is haunting your electronics, causing random and inexplicable issues.
This erratic behavior can be incredibly frustrating to diagnose, making thorough troubleshooting all the more crucial [1].
The Detective Work: Finding and Testing Short Circuits on PCBs
Now for the exciting part – becoming a PCB detective!
Locating a short circuit can be challenging,
but with a systematic approach and the right tools, you can uncover the hidden culprit.
Remember, patience is key, and sometimes, a little creativity goes a long way.
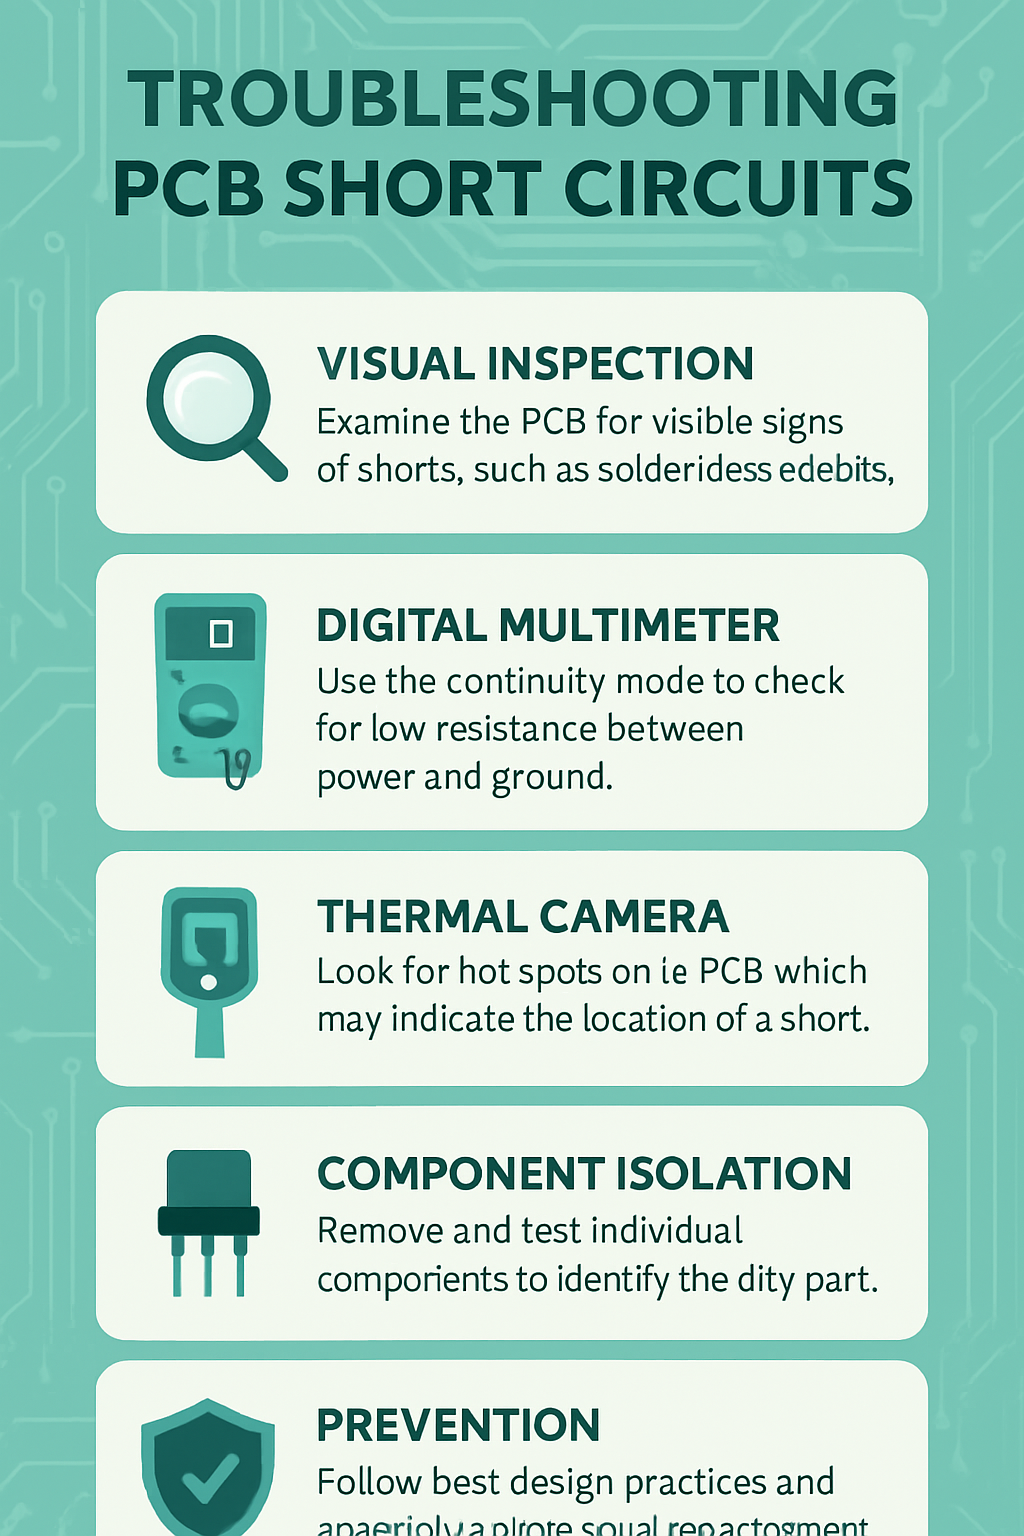
The First Clue: Visual Inspection
Before you reach for any fancy equipment, start with your eyes.
A thorough visual inspection is often the first and most crucial step.
Grab a magnifying glass or, even better, a microscope, and meticulously examine the PCB surface.
Look for any obvious signs of trouble:
burnt components, discolored traces, solder bridges, or lifted pads.
Pay close attention to the power supply points, as shorts often originate there.
Don’t forget to check the vias – those tiny holes that connect different layers of the PCB – to ensure they are properly plated and free from defects [1, 2].
Sometimes, the short literally stares you in the face!
The Trusty Sidekick: The Digital Multimeter
If a visual inspection doesn’t reveal the problem, it’s time to bring in your trusty digital multimeter.
This versatile tool is your best friend for continuity testing. Set your multimeter to continuity mode (it usually beeps when there’s a connection) or resistance mode.
Start by checking for continuity between power and ground planes. A very low resistance reading (close to 0 ohms) indicates a short.
Then, systematically test each trace and pad, especially around components.
If you find a low reading where there should be high resistance, you’re getting closer to the short [1, 2].
Remember to always start from the power supply points and work your way outwards.
The Heat Seeker: The Thermal Camera
For those elusive shorts that don’t show up with a multimeter, a thermal camera can be a game-changer.
Short circuits generate heat, and a thermal camera can visualize these hot spots, pinpointing the exact location of the problem.
Power up the board (carefully, and with a current-limited power supply if possible), and observe the thermal image.
The hottest spot is likely where your short resides.
While a thermal camera might be a significant investment for hobbyists,
it’s an invaluable tool for professional troubleshooting [1, 2].
Component by Component: The Isolation Method
Sometimes, the short might be internal to a component.
In such cases, you might need to test individual components.
This can be a tedious process, especially on complex boards, but it’s effective.
Using your multimeter, measure the resistance across each component’s pins and pads, comparing the readings to the component’s datasheet.
If a component shows an unexpected low resistance, it might be the source of the short.
You can also try desoldering components one by one (starting with those most likely to cause a short, like capacitors or ICs) to isolate the faulty part [1, 2].
The Advanced Arsenal: In-Circuit Testing and Signal Probing
For more complex PCBs, specialized tools and techniques come into play.
In-circuit testing (ICT) uses a bed of nails fixture to test each component individually while it’s still on the board.
This can quickly identify shorts and other manufacturing defects [1].
Signal probing with an oscilloscope can help you analyze waveforms and voltages at different test points, revealing anomalies that indicate a short or other circuit issues [2].
These advanced methods require specialized equipment and expertise,
but they can significantly speed up the troubleshooting process for intricate designs.
Prevention is Key: Avoiding Future PCB Short Circuits
While troubleshooting is essential, preventing short circuits in the first place is always the best approach.
A little foresight in design and maintenance can save you a lot of headaches down the line.
Design for Success: Best Practices for PCB Layout
The design phase is where many potential short circuits can be avoided.
It’s crucial to follow best practices for PCB layout.
This includes ensuring proper separation between components and traces.
A crowded board is an invitation for shorts, especially when components are too close to different tracks.
Think of it as giving your electrical pathways enough breathing room.
Proper insulation between traces is paramount, and designers should also ensure the power supply provides enough power without overloading the PCB [1].
Maintenance Matters: Keeping Your PCBs Healthy
Even the best-designed PCBs need a little love and care.
Regular inspections and cleaning can go a long way in preventing short circuits.
Dust, debris, and moisture can accumulate over time, leading to corrosion and potential shorts.
Use appropriate tools and techniques for cleaning – PCBs are delicate, and the wrong approach can cause more harm than good.
Using proper cleaning products can also help protect the components and extend the life of your board [1].
Rigorous Testing: Catching Problems Early
Testing isn’t just for troubleshooting; it’s a critical part of prevention.
Thorough testing during manufacturing and assembly can catch potential shorts before the PCB even leaves the factory.
Multimeters are reliable tools for checking continuity and identifying incorrect connections.
Following standard testing processes and meticulously measuring during each stage of production can significantly reduce the incidence of short circuits [1].
Conclusion: Empowering Your PCB Troubleshooting Journey
Troubleshooting short circuits on PCBs can seem like a daunting task, but with the right knowledge, tools, and a methodical approach, it becomes a solvable puzzle.
From the initial visual inspection to the precise measurements with a multimeter, and even the advanced insights from a thermal camera,
each step brings you closer to identifying and rectifying the issue.
More importantly, understanding the root causes—
be it manufacturing defects, environmental factors,
or improper soldering—empowers you to take proactive measures,
ensuring the longevity and reliability of your electronic devices.
Remember, every short circuit is an opportunity to learn and refine your skills,
transforming you into a more adept and confident electronics enthusiast.
So, embrace the challenge, apply these creative troubleshooting techniques, and keep those circuits flowing smoothly!
References
[1] ElePCB. (2024, February 14). *PCB Short Circuit Prevention: Strategies, Detection, and Solutions*. Retrieved from
[. *How to Troubleshoot and Repair Your PCB*. Retrieved from