
Liquid damage is one of the most common and dreaded culprits behind electronic device failure.
Whether it’s a spilled cup of coffee on your laptop, a dropped phone in the toilet, or an accidental dunking, the immediate aftermath can be panic-inducing.
Many people assume their device is a goner and immediately consider replacement.
However, for skilled technicians and determined DIY enthusiasts, liquid damage often presents an opportunity for component-level repair, a specialized field that can bring seemingly dead electronics back to life.
This comprehensive guide will delve into the intricate world of repairing liquid-damaged electronics at the component level, exploring the tools, techniques, and meticulous steps required to achieve successful restorations. 💡
Understanding the Enemy: How Liquid Damages Electronics
Before we dive into repairs, it’s crucial to understand precisely how liquid wreaks havoc on electronic devices.
It’s not just about getting wet; it’s about the subsequent chemical reactions and physical changes.
The Immediate Impact: Short Circuits
When liquid, especially conductive liquids like water with dissolved minerals or sugary drinks, comes into contact with live circuitry, it can create unintended electrical pathways.
This leads to short circuits, where electricity bypasses its intended path and flows through the liquid.
Short circuits can cause components to overheat, burn out, and even permanently damage integrated circuits (ICs) and other sensitive parts.
The immediate instinct to power on a wet device is often the worst thing you can do, as it energizes these short circuits. 😬
The Lingering Threat: Corrosion
Even if the device is immediately powered off, the real long-term damage often comes from corrosion.
When water evaporates, it leaves behind minerals and contaminants.
These residues, especially when combined with oxygen and an electric current (even a residual one from a battery), initiate electrochemical corrosion.
Corrosion manifests as greenish or whitish crusty deposits on solder joints, component legs, and traces on the Printed Circuit Board (PCB).
This corrosion eats away at conductive materials, creating open circuits, intermittent connections, and ultimately device failure.
Different liquids cause different types of corrosion.
Sugary drinks leave sticky residues that attract dust and can also be corrosive.
Saltwater is notoriously destructive due to its high conductivity and aggressive corrosive properties. 🌊
| Type of Liquid | Primary Damage Mechanism | Severity of Corrosion |
|---|---|---|
| Pure Water (distilled) | Less conductive, but still promotes short circuits if power is on. Evaporation leaves minimal residue. | Low (if device is powered off immediately) |
| Tap Water | Moderate conductivity due to minerals, leading to more immediate short circuits and significant corrosion. | Medium to High |
| Sugary Drinks (soda, juice) | High conductivity and sticky residue. Residue attracts dust, hinders cleaning, and can become acidic. | High |
| Saltwater | Extremely high conductivity and aggressive corrosion due to chlorides. Fastest and most severe damage. | Very High (often catastrophic) |
| Alcohol (pure, high proof) | Less conductive, evaporates quickly with minimal residue. Can be used for cleaning. | Low (can even aid in prevention if applied quickly and correctly) |
The Golden Rules of Initial Response 📌
Your actions in the first few minutes after liquid exposure can significantly impact the success rate of a repair.
“Time and tide wait for no man, especially when it comes to liquid-damaged electronics.”
- Power Off Immediately: Disconnect all power sources. This includes unplugging from the wall and, most importantly, removing the battery if possible. This halts current flow and minimizes short-circuit damage.
- Do NOT Turn It On: Resist the urge to test if it still works. This will only exacerbate the damage.
- Dry It Out (Initially): Gently blot visible liquid with an absorbent cloth. Do NOT use heat (like a hairdryer) directly, as this can cook components or push liquid deeper.
- Seek Professional Help (or Prepare for DIY): If you’re not confident in your skills, take it to a professional immediately. If you plan to DIY, gather your tools and proceed with caution.
Essential Tools for Component-Level Repair 🛠️
Component-level repair requires precision and specialized tools.
Here’s a breakdown of what you’ll need:
- Microscope: A stereo microscope (binocular or trinocular) with magnification typically ranging from 7x to 45x is indispensable. You cannot effectively inspect or work on tiny surface-mount components without one.
- Soldering Station: A high-quality soldering station with adjustable temperature control and a fine-tip iron for intricate work.
- Hot Air Rework Station: Essential for removing and replacing integrated circuits (ICs) and other surface-mount devices (SMDs) that have multiple pins or are glued down.
- Ultrasonic Cleaner: A game-changer for cleaning PCBs. Filled with appropriate cleaning solution, it uses high-frequency sound waves to dislodge corrosion and residues from hard-to-reach areas.
- Isopropyl Alcohol (IPA) 99%+: The primary cleaning agent for PCBs. It evaporates quickly and leaves minimal residue.
- Flux: Essential for proper solder flow and adhesion. Liquid flux or flux paste.
- Solder and Desoldering Braid/Pump: Fine gauge solder (e.g., 0.3mm or 0.5mm) and desoldering wick or a desoldering pump for removing old solder.
- Multimeter: For continuity testing, voltage checks, and identifying short circuits.
- Precision Tweezers and Spudgers: For handling tiny components and carefully disassembling devices.
- Micro-jumpers/Enamel Wire: Extremely fine wire for repairing broken traces.
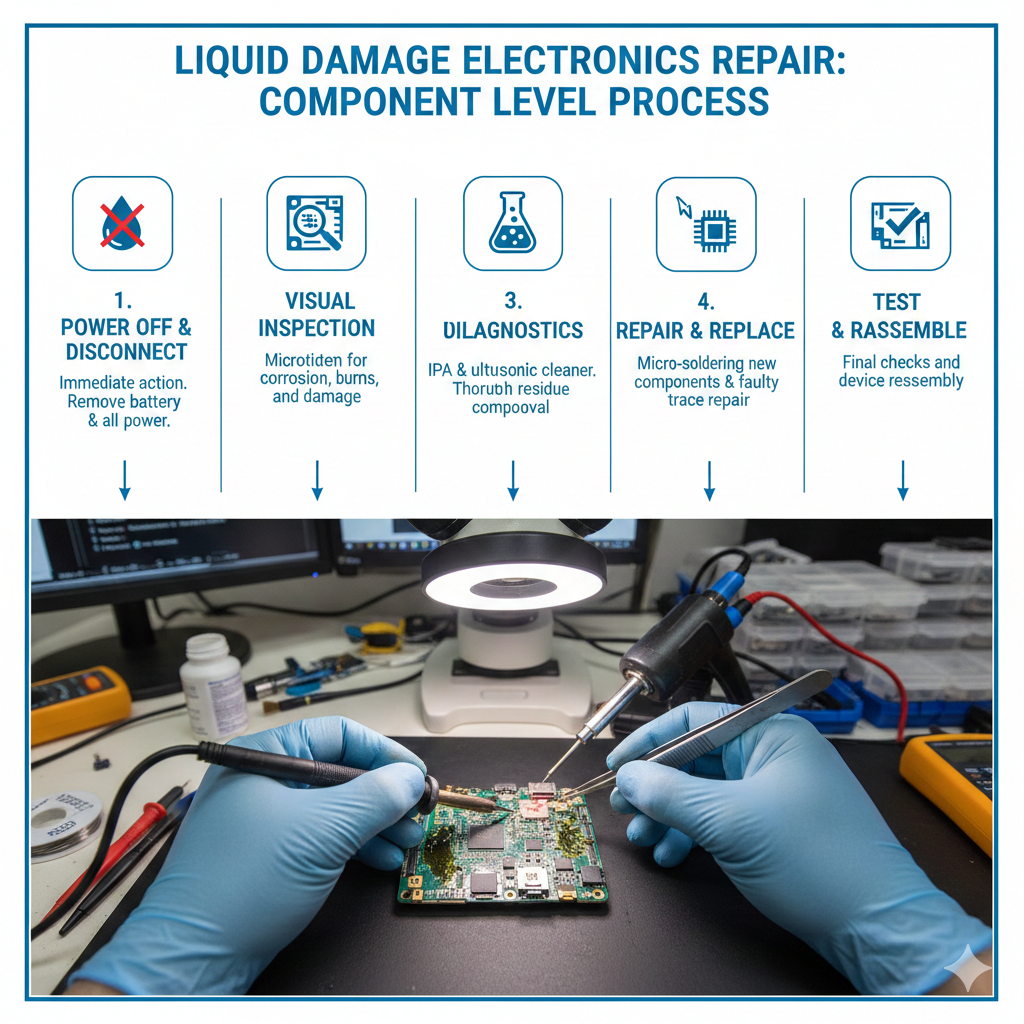
The Component-Level Repair Process: A Step-by-Step Guide 🤓
This process is meticulous and requires patience.
Rushing will only lead to further damage.
Step 1: Disassembly and Initial Inspection
Carefully disassemble the device.
Document each step with photos or videos, especially the placement of screws and cables.
Once the PCB (Printed Circuit Board) is exposed, perform a visual inspection under your microscope.
Look for obvious signs of liquid residue, corrosion, burnt components, or discoloration.
Pay close attention to connectors, IC pins, and areas around power management chips.
Step 2: Cleaning the PCB
This is perhaps the most critical step.
Thorough cleaning removes corrosive residues and prevents further damage.
- IPA Wash: Generously apply 99%+ Isopropyl Alcohol to the affected areas and gently scrub with a soft-bristle brush (like a toothbrush or an ESD-safe brush). This helps dissolve water-soluble contaminants. Repeat until no visible residue remains.
- Ultrasonic Cleaning (Recommended): For severe corrosion or complex boards, an ultrasonic cleaner is highly effective. Place the PCB (without battery or other non-waterproof components) in a suitable cleaning solution (e.g., diluted IPA or specialized PCB cleaning solution) and run for several minutes. After ultrasonic cleaning, rinse with fresh IPA and allow to air dry completely or use low heat (below 60°C).
- Drying: Ensure the PCB is completely dry before proceeding. This can take hours, or you can use a heat mat or gentle hot air (from your rework station, carefully) at a low temperature.
You can see a great demonstration of cleaning techniques here:
Step 3: Post-Cleaning Inspection and Diagnostics
After cleaning, reinspect the PCB under the microscope.
The board should look pristine.
Now, it’s time for diagnostics.
- Continuity Checks: Use your multimeter in continuity mode to check for short circuits, especially around power rails and suspected damaged areas. Look for broken traces by checking continuity between components that should be connected.
- Diode Mode/Resistance Readings: Compare resistance or diode mode readings of components in the damaged area with a known good board (if available) or schematics. This can help identify components that have failed open or shorted.
- Thermal Imaging (Advanced): If you have access, a thermal camera can help identify components that are overheating when power is applied, pointing to shorts or failing ICs.
Step 4: Component Replacement and Trace Repair
This is where the micro-soldering skills come into play.
Based on your diagnostics, you’ll identify faulty components or broken traces.
- Replacing SMDs (Resistors, Capacitors, Diodes): Use your soldering iron with fine tips. Apply flux, desolder the faulty component, clean the pads, and then solder on a new one of the exact same value.
- Replacing ICs (Integrated Circuits): This usually requires a hot air rework station. Apply flux around the IC, heat evenly with hot air until the solder melts, and carefully lift the IC with tweezers. Clean the pads thoroughly (reballing may be necessary for BGA chips), apply fresh solder paste, align the new IC, and reflow with hot air.
- Repairing Broken Traces: If a copper trace on the PCB has corroded away, you can bridge the gap using fine enamel-coated wire (magnet wire). Scrape away the solder mask on either side of the break, tin the exposed copper, solder the jumper wire, and then apply a UV-curable solder mask or epoxy to protect the repair.
Here’s another useful video on micro-soldering techniques:
Step 5: Testing and Reassembly
Once repairs are complete, perform another round of continuity checks to ensure no new shorts were introduced and all connections are solid.
Before full reassembly, it’s often wise to test the PCB outside the device with minimal components attached.
For example, with a laptop, try powering on with just the display and essential peripherals.
If all checks out, proceed with careful reassembly.
Common Challenges and Troubleshooting Tips 🧐
- Hidden Corrosion: Liquid can seep under ICs, especially Ball Grid Array (BGA) chips, causing corrosion that’s invisible from the outside. If you suspect this, the IC may need to be removed and reballed.
- Multiple Failures: Liquid damage rarely affects just one component. Be prepared to find and replace several faulty parts.
- No Schematics: For many consumer electronics, schematics are not readily available, making diagnostics challenging. This is where experience, pattern recognition, and comparing with known good boards become invaluable.
- Data Recovery vs. Device Functionality: Sometimes, the focus is solely on recovering data from a storage device, even if the mainboard isn’t fully repairable. Prioritize what’s most important to the owner.
Preventative Measures 🛡️
An ounce of prevention is worth a pound of cure.
While accidents happen, some steps can minimize the risk:
- Keep liquids away from your devices. ☕
- Use waterproof cases or covers if you frequently use devices in high-risk environments.
- Consider insurance for valuable electronics.
The Rewards of Component-Level Repair 🏆
Successfully repairing a liquid-damaged device at the component level is incredibly rewarding.
It saves money, reduces electronic waste, and often saves invaluable data.
It’s a testament to skill, patience, and a deep understanding of electronics.
While challenging, the journey from a corroded, non-functional board to a fully operational device is a truly satisfying endeavor for any tech enthusiast or professional.
“Every problem is a gift – without problems we would not grow.” This certainly applies to the learning curve in component-level repair.
For more insights into electronics repair, check out these resources:
- iFixit – Repair Guides
- All About Circuits – Electronics Tutorials
- Electronics Stack Exchange – Q&A Community
- SparkFun Learn – Electronics Projects & Guides
- Adafruit Learning System – DIY Electronics Tutorials
Infographic: Steps to Repair Liquid Damage
Here’s an infographic summarizing the repair process: