
In the fast-paced world of technology, problems are inevitable.
Whether you’re a developer, an IT professional, or a regular user, encountering issues with software, hardware, or processes is a common occurrence.
The key to navigating these challenges efficiently lies in well-structured and easily accessible troubleshooting documentation.
But what makes a troubleshooting guide truly effective?
How can you create templates that not only address immediate problems but also empower users to solve issues independently?
I’m here to share my insights and best practices to help you master the art of troubleshooting documentation.
Effective troubleshooting documentation isn’t just about listing solutions; it’s about guiding users through a logical process to identify, diagnose, and resolve problems.
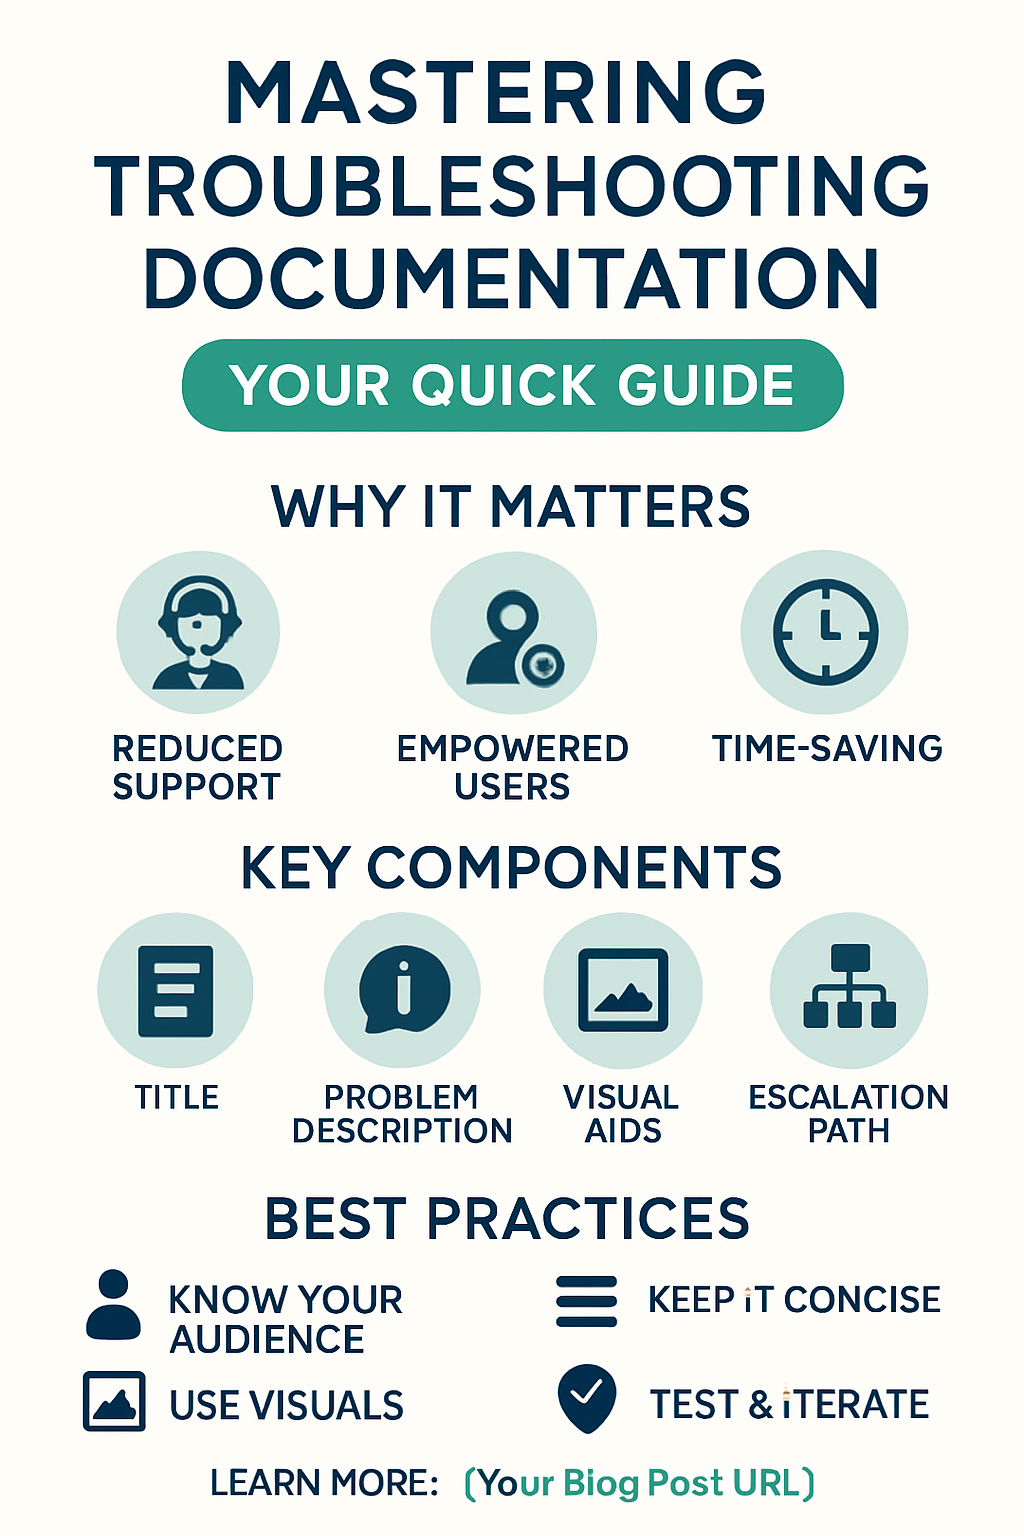
It reduces support load, improves user satisfaction, and ultimately saves time and resources.
Let’s dive into the world of troubleshooting documentation templates and unlock the secrets to seamless problem-solving
Videos will be added as random thoughts 💭 💭 💭
Why Effective Troubleshooting Documentation Matters
Before we delve into the ‘how,’ let’s consider the ‘why.’
Why should you invest time and effort into creating robust troubleshooting documentation?
The benefits extend far beyond simply resolving immediate issues.
From a business perspective, well-crafted documentation can significantly reduce support costs by deflecting common queries and empowering users to self-serve.
This frees up your support team to focus on more complex, high-value problems.
For users, clear and concise troubleshooting guides foster a sense of independence and competence.
Imagine the frustration of encountering a problem and having no clear path to a solution.
Conversely, a well-written guide can turn a moment of panic into a productive learning experience.
It builds trust and satisfaction, enhancing the overall user experience.
Moreover, in a development or IT environment, comprehensive documentation serves as a vital knowledge base,
ensuring consistency in problem-solving approaches and facilitating smoother onboarding for new team members.
It’s a living repository of solutions, constantly evolving with new challenges and discoveries.
Key Components of an Effective Troubleshooting Guide
So, what exactly goes into a troubleshooting guide that truly helps?
Based on my research and experience, several key components consistently stand out.
Think of these as the building blocks for your templates, ensuring that every guide you create is comprehensive and user-friendly.
First and foremost, a clear and concise title is crucial.
It should immediately tell the user what problem the guide addresses.
Following that, a brief problem description helps users confirm they are in the right place.
This might seem obvious, but often users jump into solutions without fully understanding the problem they’re trying to solve.
I always recommend starting with a simple, straightforward explanation of the issue at hand.
Next, and perhaps most critically, is the step-by-step solution.
This is where you break down complex tasks into manageable, actionable steps. Each step should be clear, unambiguous, and easy to follow.
I find that using numbered lists works best here, as it provides a visual roadmap for the user.
Avoid technical jargon wherever possible, or if it’s unavoidable, make sure to provide clear explanations or links to definitions.
Remember, your audience might not be as technically savvy as you are.
Visual aids are incredibly powerful. Screenshots, diagrams, and short video clips can often convey information more effectively than paragraphs of text.
I always try to include visuals whenever a step involves navigating a user interface or identifying a physical component.
They act as signposts, reassuring users that they are on the right track.
Think about how much easier it is to follow instructions when you can see what the end result should look like.
Finally, don’t forget about the ‘What if it didn’t work?’ section.
This is where you provide alternative solutions, common pitfalls, or escalation paths.
It’s a crucial part of managing user expectations and preventing frustration.
If a user follows all the steps and the problem persists, they need to know what to do next.
This could be a link to further resources, contact information for support, or suggestions for gathering more diagnostic information.
It shows you’ve anticipated their needs and are ready to continue assisting them.
Best Practices for Crafting Troubleshooting Documentation Templates
Creating effective troubleshooting documentation isn’t just about including the right components;
it’s also about how you present that information.
Over the years, I’ve identified several best practices that consistently lead to more user-friendly and impactful guides.
Adhering to these principles will elevate your documentation from merely functional to truly exceptional.
1. Know Your Audience: This is perhaps the most critical starting point.
Are you writing for technical experts, end-users, or a mix of both?
The language, level of detail, and types of solutions you provide will vary significantly based on your audience’s technical proficiency.
For instance, a guide for developers might include code snippets and API references, while a guide for general users should focus on simple, jargon-free language and visual cues.
Always tailor your content to who will be reading it.
2. Use Clear, Concise, and Jargon-Free Language:
As mentioned earlier, avoid technical jargon unless absolutely necessary, and if it is, define it clearly.
Every word should serve a purpose. Long, convoluted sentences can confuse and frustrate users.
Aim for short, direct sentences and paragraphs.
Think about how you would explain the solution to someone completely unfamiliar with the topic. Simplicity is key.
3. Structure for Scannability: Users often come to troubleshooting guides in a state of urgency or frustration.
They need to find answers quickly.
Employing a clear, logical structure with headings, subheadings, bullet points, and numbered lists makes your documentation easy to scan.
This allows users to quickly locate the relevant section without having to read through the entire document.
A well-organized table of contents can also be incredibly helpful for longer guides.
4. Incorporate Visual Aids: I cannot stress this enough. Screenshots, flowcharts, diagrams, and even short animated GIFs or videos can dramatically improve comprehension.
A picture is truly worth a thousand words when it comes to showing users where to click, what an error message looks like, or how to connect a cable.
Ensure your visuals are high-quality, clearly annotated, and up-to-date.
5. Start with the Most Common Solutions:
When structuring your guide, consider the frequency of problems. Lead with the most common and easiest-to-implement solutions.
This allows a significant portion of your users to resolve their issues quickly without delving into more complex troubleshooting steps.
It’s about optimizing the user’s path to resolution.
6. Provide Actionable Steps: Each step in your solution should be an action the user can take. Instead of saying
‘The system might be misconfigured,’ say ‘Check the system configuration settings in the ‘Preferences’ menu.’
Be specific and guide the user through each click, each setting change, or each command they need to execute.
7. Test and Iterate: Your troubleshooting documentation is never truly ‘finished.’
Technology evolves, new problems emerge, and user feedback provides invaluable insights.
Regularly test your guides by having different users (especially those unfamiliar with the problem) follow them.
Pay attention to where they get stuck or confused. Use this feedback to refine and improve your documentation.
Continuous iteration ensures your guides remain relevant and effective.
This iterative process is key to maintaining high-quality documentation.
8. Link to Related Resources: Don’t make your troubleshooting guide a dead end.
If a problem is related to a specific product feature, link to the relevant user manual section.
If a solution requires a software update, link directly to the download page.
Providing these contextual links enhances the user experience and ensures they have all the information they need at their fingertips.
This also helps in creating a more interconnected knowledge base.
9. Maintain a Consistent Tone and Style: Consistency in language, formatting, and tone across all your documentation makes it easier for users to navigate and understand.
Develop a style guide for your documentation team to ensure everyone adheres to the same standards.
This professionalism builds trust and makes your documentation more credible.
10. Include a ‘Last Resort’ or Escalation Path:
Even the best troubleshooting guides won’t solve every problem for every user.
It’s crucial to provide clear instructions on what to do if all else fails.
This could be contacting customer support, submitting a bug report, or visiting a community forum.
Make it easy for users to get further help when they need it, preventing frustration and improving their overall experience.
This shows empathy and a commitment to support.
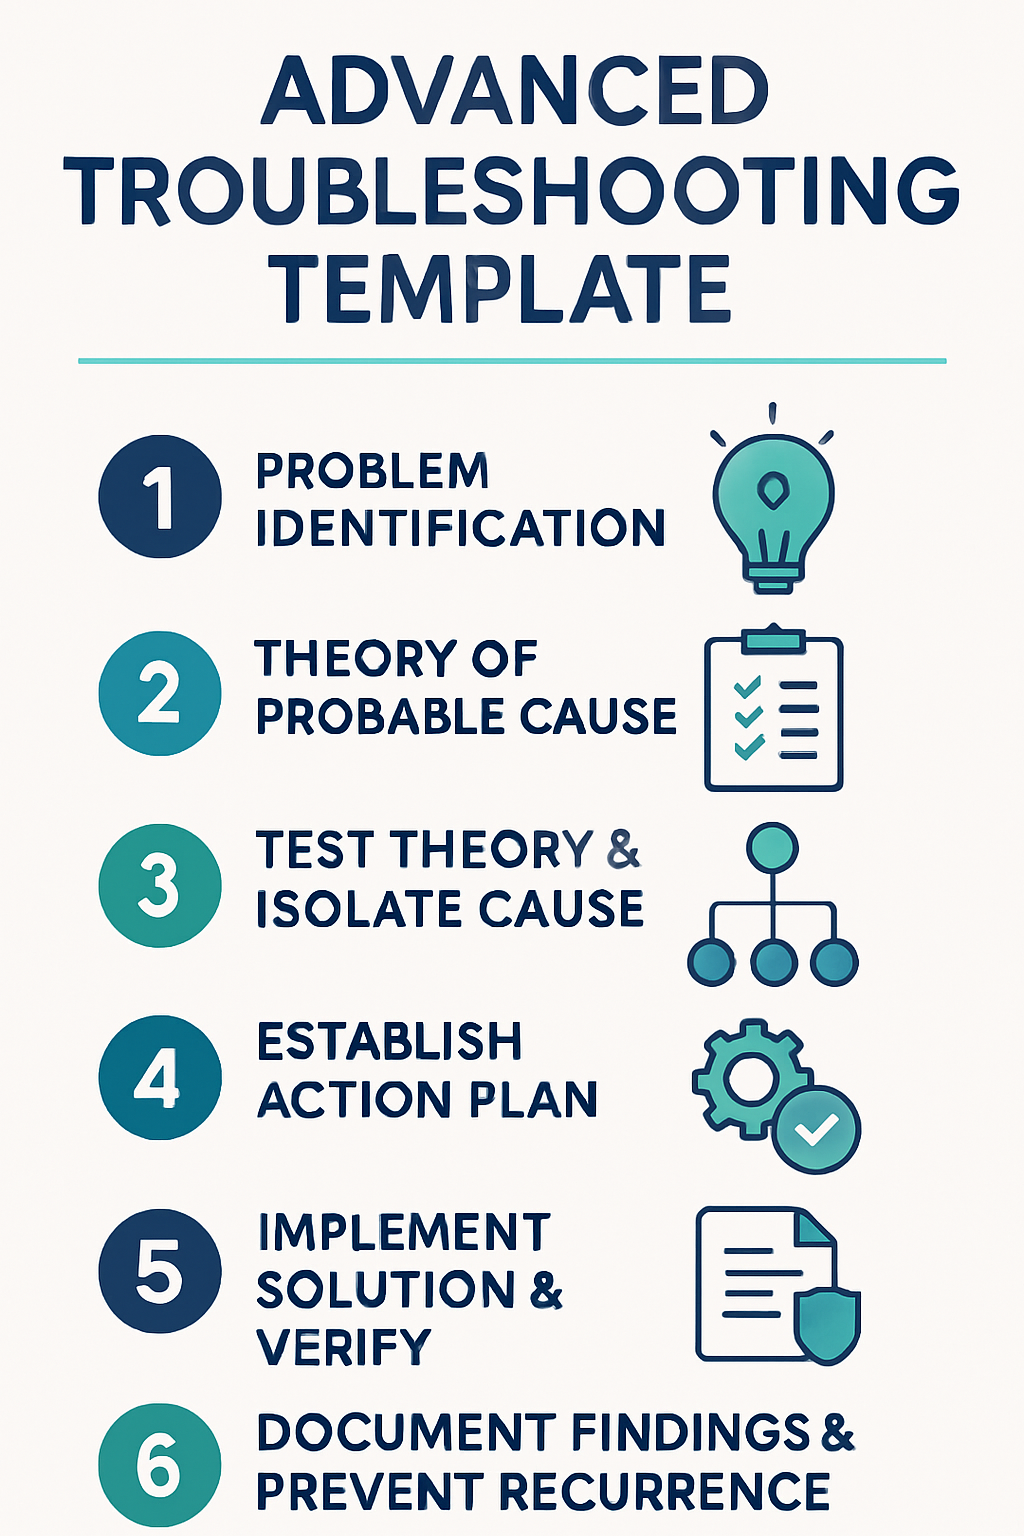
Crafting Your Own Effective Troubleshooting Templates
Now that we’ve covered the essential components and best practices, let’s talk about how you can put this knowledge into action by crafting your own effective troubleshooting templates.
A good template acts as a blueprint, ensuring consistency and completeness across all your troubleshooting guides.
It streamlines the creation process and guarantees that no critical information is missed.
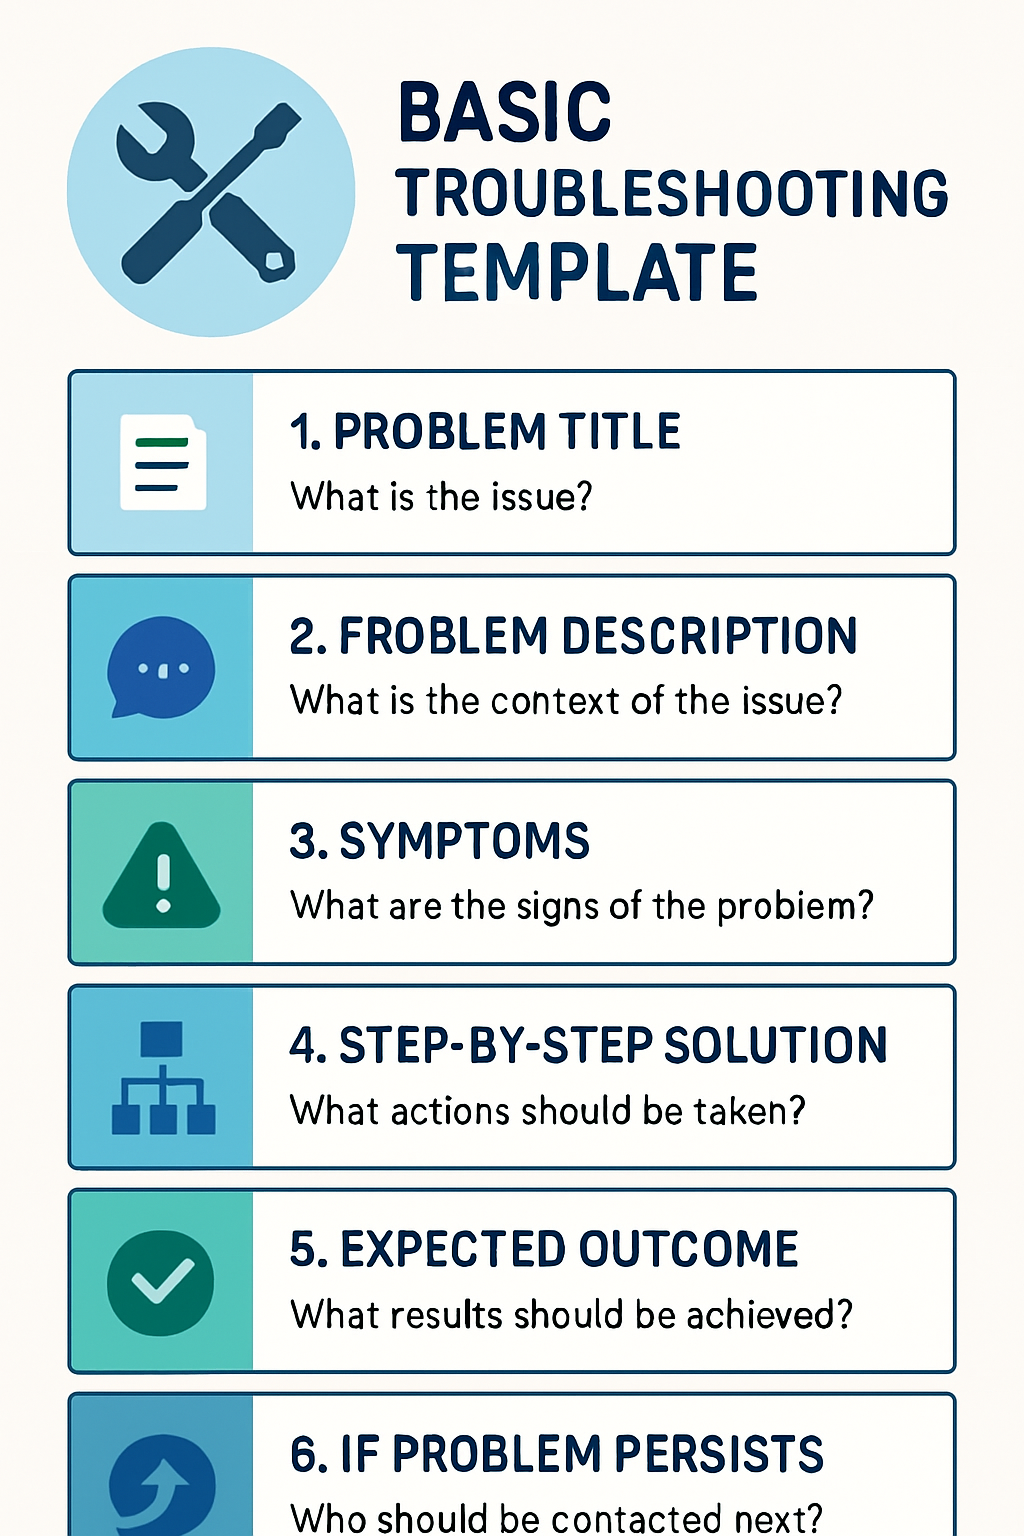
Start with a Basic Structure: Every template should begin with a foundational structure.
I recommend including placeholders for the following:
Guide Title: A clear, descriptive title for the specific problem.
Problem Description: A concise explanation of the issue.
Symptoms: What does the user observe when the problem occurs?
Environment/Context: What system, software version, or conditions are relevant?
Step-by-Step Solution: Numbered steps to resolve the issue.
Expected Outcome: What should happen after following the steps?
Troubleshooting Tips/Common Pitfalls: Additional advice or things to watch out for.
If the Problem Persists: Escalation path or alternative solutions.
Related Resources: Links to further documentation or support.
Customize for Different Problem Types:
Not all problems are created equal, and neither should all templates be.
Consider creating variations of your core template for different types of issues.
For example, a software troubleshooting template might include sections for error codes and log file analysis,
while a hardware troubleshooting template might focus on physical connections and indicator lights.
Tailoring your templates ensures they are relevant and efficient for the specific context.
Incorporate Conditional Logic (if applicable):
For more advanced documentation systems, you might be able to incorporate conditional logic into your templates.
This means certain sections only appear if specific conditions are met.
For instance, if a user selects a particular operating system, only the troubleshooting steps relevant to that OS are displayed.
This dynamic approach can significantly enhance the user experience by presenting only pertinent information.
Design for Collaboration: If multiple people will be contributing to your troubleshooting guides, design your templates with collaboration in mind.
Use clear formatting, consistent terminology, and perhaps even add comments or instructions within the template itself to guide content creators.
Version control is also crucial to track changes and ensure everyone is working with the latest information.
Review and Refine Regularly: Just like the guides themselves, your templates should not be static.
As you gain more experience and receive feedback, you’ll discover ways to improve your templates.
Perhaps a new section is needed, or an existing one can be simplified.
Regularly review your templates to ensure they remain effective and continue to meet the evolving needs of your users and support team.
This iterative improvement is vital for long-term success.
Conclusion: Empowering Users, One Solution at a Time
Creating effective troubleshooting documentation templates is an investment that pays dividends in reduced support costs, increased user satisfaction, and a more efficient problem-solving ecosystem.
By understanding the core components, adhering to best practices, and continuously refining your approach, you can empower your users to navigate challenges with confidence.
Remember, the goal isn’t just to fix problems, but to foster understanding and independence.
So go forth, craft those templates, and transform troubleshooting from a headache into a seamless experience for everyone involved.
Your users (and your support team) will thank you for it!