
The “no display” issue on a graphics card (GPU) is one of the most common and frustrating problems encountered in PC repair and diagnostics.
The system powers on, fans spin, RGB lighting activates, drives may even be heard initializing — yet the monitor remains completely blank.
No signal.
No BIOS splash screen.
No error codes.
This situation creates confusion because it can be caused by anything from a completely trivial mistake like a loose cable to a major hardware failure deep inside the GPU’s power architecture or BGA interface.
Diagnosing this problem requires a structured, methodical approach.
Jumping straight to the GPU or motherboard is a mistake many beginners make; in reality, a large percentage of “no display” cases can be solved by systematically inspecting cables, ports, power delivery, and configuration errors before investigating deeper hardware faults.
This expanded guide covers the complete diagnostic workflow in a technician-style process — from the simplest checks you should never skip, to advanced failure analysis involving GPU components such as VRAM, MOSFETs, and the GPU core.
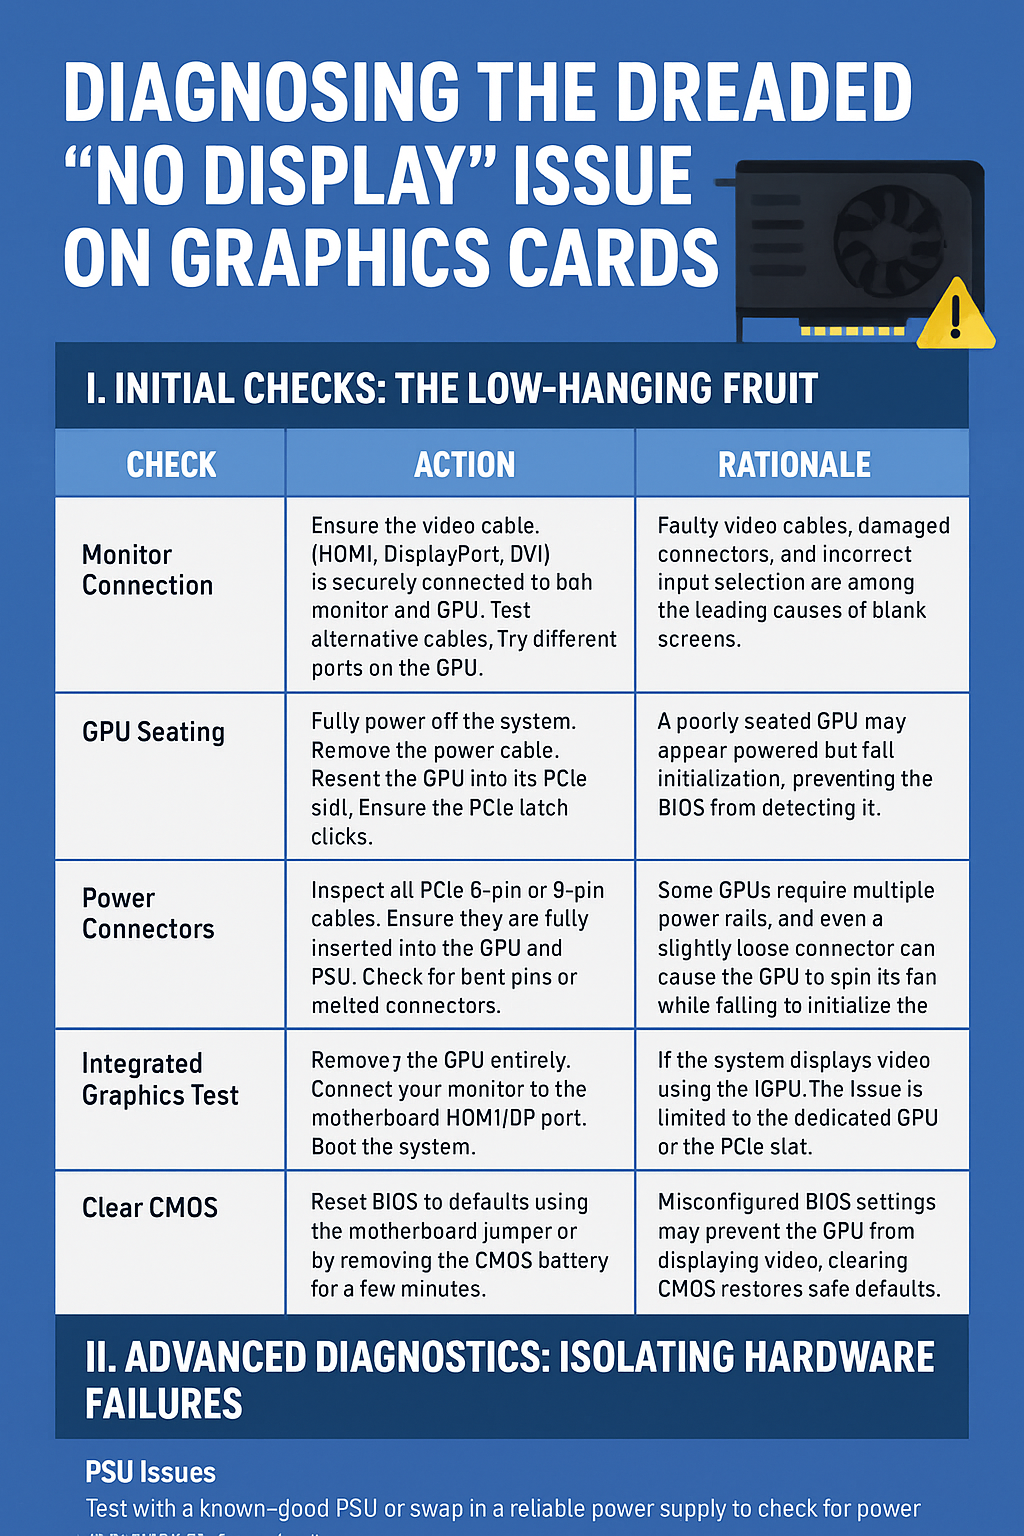
I. Initial Checks: The Low-Hanging Fruit
Before assuming the GPU is dead or the motherboard slot is damaged, it is essential to perform a set of preliminary checks.
These steps are simple, fast to perform, and statistically responsible for over 60% of “no display” cases.
Many beginners skip these steps, leading to wasted time and unnecessary component replacements.
Below is an expanded diagnostic table with explanations that broaden the context and importance of each check.
| Check | Action | Rationale |
|---|---|---|
| Monitor Connection | Ensure the video cable (HDMI, DisplayPort, DVI) is firmly connected to both monitor and GPU. Test alternative cables. Try different ports on the GPU. Ensure the monitor is set to the correct input source. | Faulty video cables, damaged connectors, and incorrect input selection are among the leading causes of blank screens. |
| GPU Seating | Fully power off the system. Remove the power cable. Reseat the GPU into its PCIe slot. Ensure the PCIe latch clicks. Confirm that the bracket screws securing the GPU are tightened properly to avoid sagging. | A poorly seated GPU may appear powered but fail initialization, preventing the BIOS from detecting it. |
| Power Connectors | Inspect all PCIe 6-pin or 8-pin cables. Ensure they are fully inserted into the GPU and PSU. Check for bent pins or melted connectors. Test with another PCIe cable if available. | Some GPUs require multiple power rails, and even a slightly loose connector can cause the GPU to spin its fans while failing to initialize the core. |
| Integrated Graphics Test | Remove the GPU entirely. Connect your monitor to the motherboard HDMI/DP port. Boot the system. If integrated graphics were disabled in BIOS, clear CMOS first. | If the system displays video using the iGPU, the issue is limited to the dedicated GPU or the PCIe slot. |
| Clear CMOS | Reset BIOS to defaults using the motherboard jumper or by removing the CMOS battery for a few minutes. Reinstall the battery and reboot. | Misconfigured BIOS settings may prevent the GPU from displaying video; clearing CMOS restores safe defaults. |
Why these steps matter:
Most GPU failures that reach technician shops turn out to be extremely simple — loose DisplayPort cables, misaligned GPUs, or BIOS settings blocking initialization.
Performing these initial checks saves time and helps avoid unnecessary disassembly or component-level troubleshooting.
II. Advanced Diagnostics: Isolating Hardware Failures
If all basic checks fail, it is time to dive deeper into the core hardware systems responsible for GPU communication, power delivery, and initialization.
At this stage, the goal is to identify whether the root cause lies in the PSU, the PCIe slot or motherboard, or the graphics card itself.
Let’s break these down in detail so you can isolate the issue methodically and efficiently.
A. Power Supply Unit (PSU) Issues
Even when fans spin and lights turn on, the PSU may be failing to deliver the stable and sufficient power required for GPU initialization.
Modern GPUs depend on multiple voltage rails — 12V, 5V, and sometimes 3.3V — which must remain stable under load for the GPU to complete its POST sequence.
PSU wattage matters.
Every GPU has a minimum PSU requirement and attempting to power a mid-range or high-end GPU with an insufficient PSU may lead to black screens, random reboots, or no display during cold boot.
Even with adequate wattage, PSU rails degrade over time and ripple, sagging voltages, or delayed power-good signals can all result in the GPU failing to initialize.
Testing with a known-good PSU or using a PSU tester will quickly rule out power delivery as the culprit.
PCIe connectors can also burn, loosen, or oxidize over time.
Even a slightly damaged cable can cause the GPU’s power phases to fail to activate, preventing VRMs from powering the GPU core.
B. Motherboard and PCIe Slot Issues
Sometimes the GPU works perfectly in another system, but the motherboard is the source of the failure.
Moving the GPU to a secondary PCIe slot is a quick test to determine if the primary slot is damaged.
Visually inspect the PCIe slot for bent, burnt, or corroded pins, objects lodged inside the slot, heat damage, or liquid residue from spills or humidity.
Even a single damaged pin can block the GPU from communicating with the CPU and result in no display.
Certain BIOS settings can also break GPU initialization.
Settings such as forcing PCIe mode to an incompatible generation, disabling legacy support incorrectly, or setting the primary display to the integrated GPU can all prevent a dedicated card from showing any output.
Resetting the BIOS by clearing CMOS is a safe and effective step to eliminate BIOS-related failures.
C. Graphics Card Component Failure
If you have eliminated PSU and motherboard issues, the most likely culprit is the GPU itself.
Dedicated graphics cards contain dozens of components, all of which must function correctly for the GPU to display output.
Visual inspection is the first internal step.
Look for burned MOSFETs, blown capacitors, charred VRM components, liquid damage, or cracked solder joints.
Thermal damage and overheating are common causes of progressive failure.
Overheated GPUs may power on but still fail to initialize due to internal damage and solder ball degradation under the BGA chip.
VRAM chips are another frequent failure point.
A single faulty VRAM module can cause complete failure to POST or intermittent artifacts before total failure.
Diagnosing VRAM issues requires specialized tools and test patterns, and in many cases the card will need professional rework or replacement.
Finally, BGA joint failures under the GPU core are the most complex and costly to repair.
Symptoms of BGA failure include fans spinning as normal and complete detection failure by the system; repair requires infrared rework, reballing, or microsoldering expertise.
III. Step-by-Step Troubleshooting Workflow
Below is a practical workflow technicians can follow to diagnose a no-display GPU in a reproducible manner.
- Start with the monitor and cable. Replace the cable, test with another monitor, and try different ports.
- Reseat the GPU and power connectors, confirm the PCIe latch, and secure the bracket screws to prevent sagging.
- Remove the GPU and test integrated graphics to rule out motherboard POST failures.
- Clear CMOS to restore BIOS defaults and eliminate configuration issues.
- Test with a known-good PSU or swap in a reliable power supply to check for power rail instability.
- Try the GPU in another system to determine whether the card itself functions elsewhere.
- If the card only fails in one system, inspect the motherboard PCIe slot and BIOS settings for compatibility issues.
- If the card fails in multiple systems and all cables and PSUs are known good, proceed to component-level inspection or seek professional rework services.
Document each step and the outcome to avoid repeating checks and to provide a clear timeline for repair or RMA.
IV. Advanced Repair Options and When to Seek Professional Help
Certain GPU failures require tools and skills beyond typical home repair and should be handled by professionals.
These include BGA rework, VRAM chip replacement, and microsoldering of VRM components.
If you notice physical smoke damage, strongly burned areas, or a PCB that has delaminated from heat exposure, stop attempts to power the board and consult a repair service.
Attempting to run a severely damaged GPU can worsen the damage and make the card irreparable.
Professional repair services use controlled hot-air and infrared reflow stations, BGA reballing kits, and microscopic inspection to restore the GPU core and surrounding components.
However, even these services have limits; a manufacturer RMA or replacement is often more cost-effective for newer or still-under-warranty cards.
V. References and Further Reading
For community troubleshooting and official manufacturer guidance, these resources are valuable starting points.
Microsoft Answers: My GPU fans work but the GPU itself is not recognized
ASUS Support: Graphics card troubleshooting for no display
PC Basic: 6 Ways To Fix GPU Turns On, But No Display (Updated 2024)
Tom’s Hardware: PC No Display Troubleshooting Guide
iFixit: GPU Repair and Disassembly Guides
https://youtu.be/3x1V6aO4wTA
VI. Final Thoughts
Diagnosing a “no display” GPU issue is a structured process of elimination that begins with the simplest, most likely causes and progresses to complex hardware diagnostics.
Patience, documentation, and a methodical approach are the technician’s best tools.
Many problems are resolved by inexpensive fixes such as replacing a cable, securing connectors, or resetting the BIOS.
However, when the issue points to VRAM defects, BGA failures, or burnt VRMs, professional repair or replacement is the correct path.
By following this diagnostic workflow, you reduce downtime, avoid unnecessary part swaps, and increase the chance of a successful repair.
If you would like, I can now convert this into a WordPress-ready HTML post, generate an infographic, or create a printable PDF.